How to Enable Microphone on Windows Server & Windows 10
In today’s digital world, microphones are essential tools for communication, automation, and media creation. Whether hosting virtual meetings, giving voice commands, or recording audio, enabling microphone access is crucial. While Windows Server 2022 is typically used for backend operations, there are times when microphone functionality is needed, just like on Windows 10. This guide walks you through the simple steps to enable and manage microphone access on both platforms, ensuring you can make the most of your device’s features, whether for business or personal use.
Contents
Why Turn On Microphone Access?
Here are some common reasons why you might need to enable the microphone on a server:
– Online Meetings: Using apps like Microsoft Teams or Zoom during remote conferences.
– Voice Commands: To manage tasks hands-free with voice-controlled apps.
– Audio Recording: For creating or broadcasting audio in media-related server applications.
How to Turn On the Microphone in Windows Server 2022
Step 1: Open Privacy Settings
- Go to Settings: Click the Start menu, choose “Settings” (the gear icon), or press Windows + I to open the Settings window.
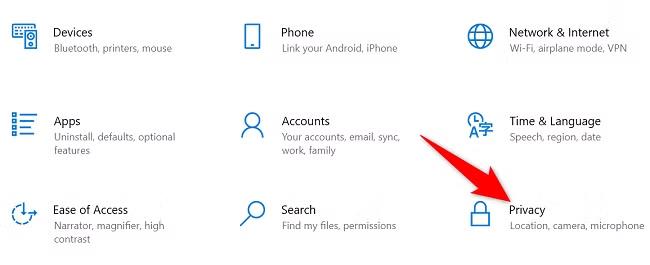
- Find Privacy Options: In the Settings window, look for and click on “Privacy.”
Step 2: Adjust Microphone Settings
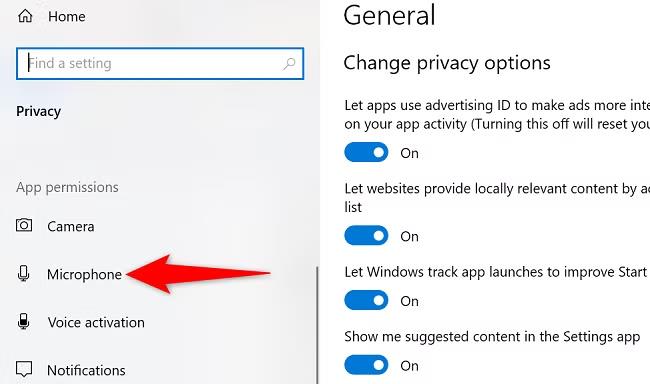
- Choose Microphone: In the Privacy menu, scroll down and click on “Microphone.”
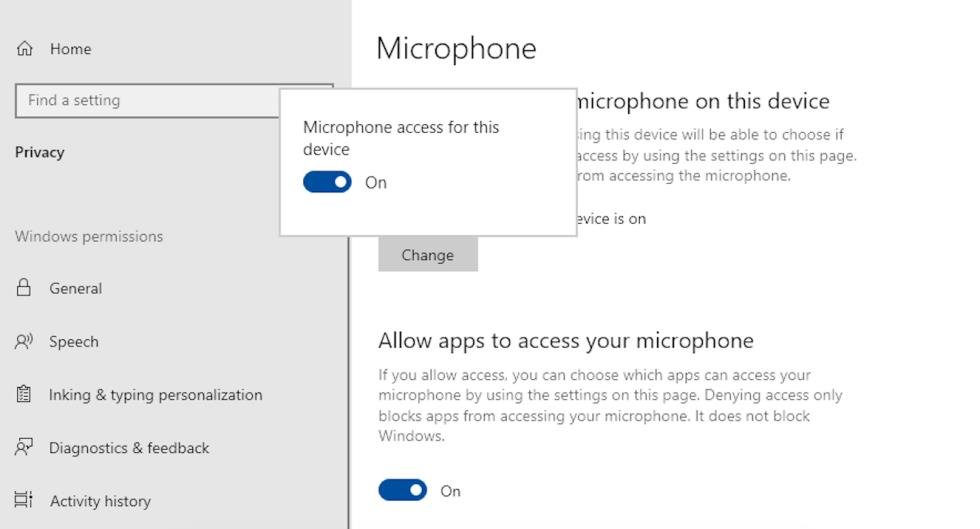
- Enable Microphone Access: Check if “Microphone access for this device” is on. If it’s off, click the “Change” button and switch it to “On.“
Step 3: Letting Apps Use the Microphone
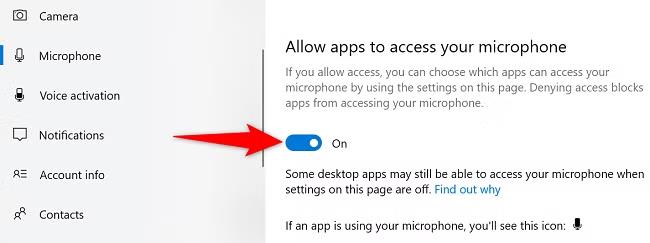
- Enable Microphone for Apps: Under “Microphone access for this device,” you’ll see a switch labelled “Allow apps to access your microphone.” Make sure it’s turned on.
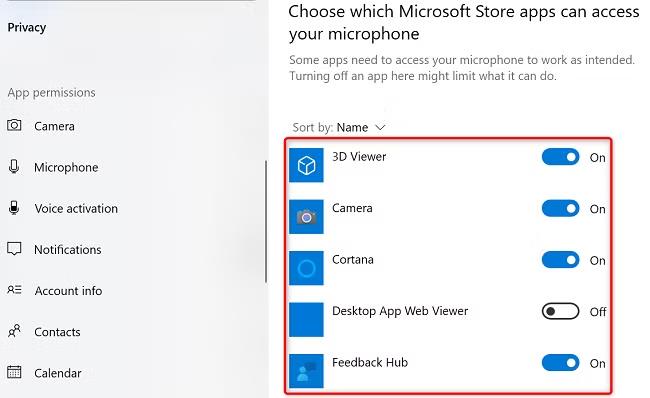
- Select Specific Apps: Scroll down to view a list of apps on your server. Turn on the switch next to any app you want to give microphone access.
Step 4: Check if the Microphone Works
- Look in Device Manager: Right-click the Start button and choose “Device Manager.” Check if your microphone is listed under “Audio inputs and outputs.”
- Test the Microphone: Open an app like Voice Recorder from the Start menu. Record a short message to confirm the microphone is working.
Step 5: Using Group Policy to Manage Microphone Access (Optional)
If you manage a server with multiple users, you can use Group Policy to control microphone settings.
- Open Group Policy Editor: Press Windows + R, type `gpedit.msc`, and press Enter.
- Find Microphone Settings: Go to Computer Configuration > Administrative Templates > Windows Components > App Privacy.
- Set Microphone Policies: Look for microphone-related policies like “Let Windows apps access the microphone.” Enable or disable these based on what works best for your setup.
Troubleshooting Microphone Issues
- Update Drivers: Make sure the microphone drivers are current. You can download the latest version from the manufacturer’s website.
- Check Permissions: Confirm that apps needing microphone access have the right permissions.
- Test the Microphone: Try using the microphone on another device to rule out hardware problems.
How to Turn On Microphone Access in Windows 10
- Open Settings: Press Windows + I to launch the Settings app.
- Go to Privacy: In the Settings menu, click on “Privacy.”
- Select Microphone: From the menu on the left side, choose “Microphone.”
- Enable Microphone Access: On the right side, find the section called “Allow access to the microphone on this device.” Click the Change button and turn the toggle switch to On.
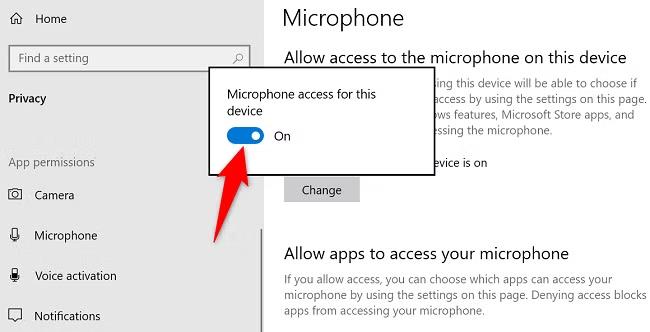
Your microphone is now enabled and ready to use.
If your computer doesn’t have a built-in microphone, you can connect an external one.
To let apps use your microphone:
- Go to the “Allow Apps to Access Your Microphone” section and turn on the toggle.
For Microsoft Store apps:
- Use the “Choose Which Microsoft Store Apps Can Access Your Microphone” section to manage mic permissions for each app.
For non-Microsoft Store apps:
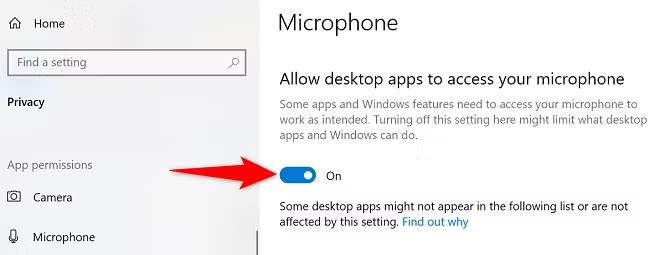
- Use the “Allow Desktop Apps to Access Your Microphone” section to give them access.
That’s it! Now your microphone is set up and ready to use on your Windows 10 PC. Have fun!
Conclusion
This guide explains how to enable and manage microphone access in Windows Server 2022 and Windows 10, focusing on tasks like online meetings, voice commands, and audio recording. It provides step-by-step instructions for accessing Privacy settings, enabling microphone access for the device and specific apps, and verifying functionality through tools like Device Manager and Voice Recorder. Additionally, it outlines optional steps for configuring microphone policies via Group Policy for servers with multiple users. Troubleshooting tips, such as updating drivers and checking permissions, are also included. For Windows 10, the guide covers similar steps with added details for managing permissions for Microsoft Store and desktop apps.


